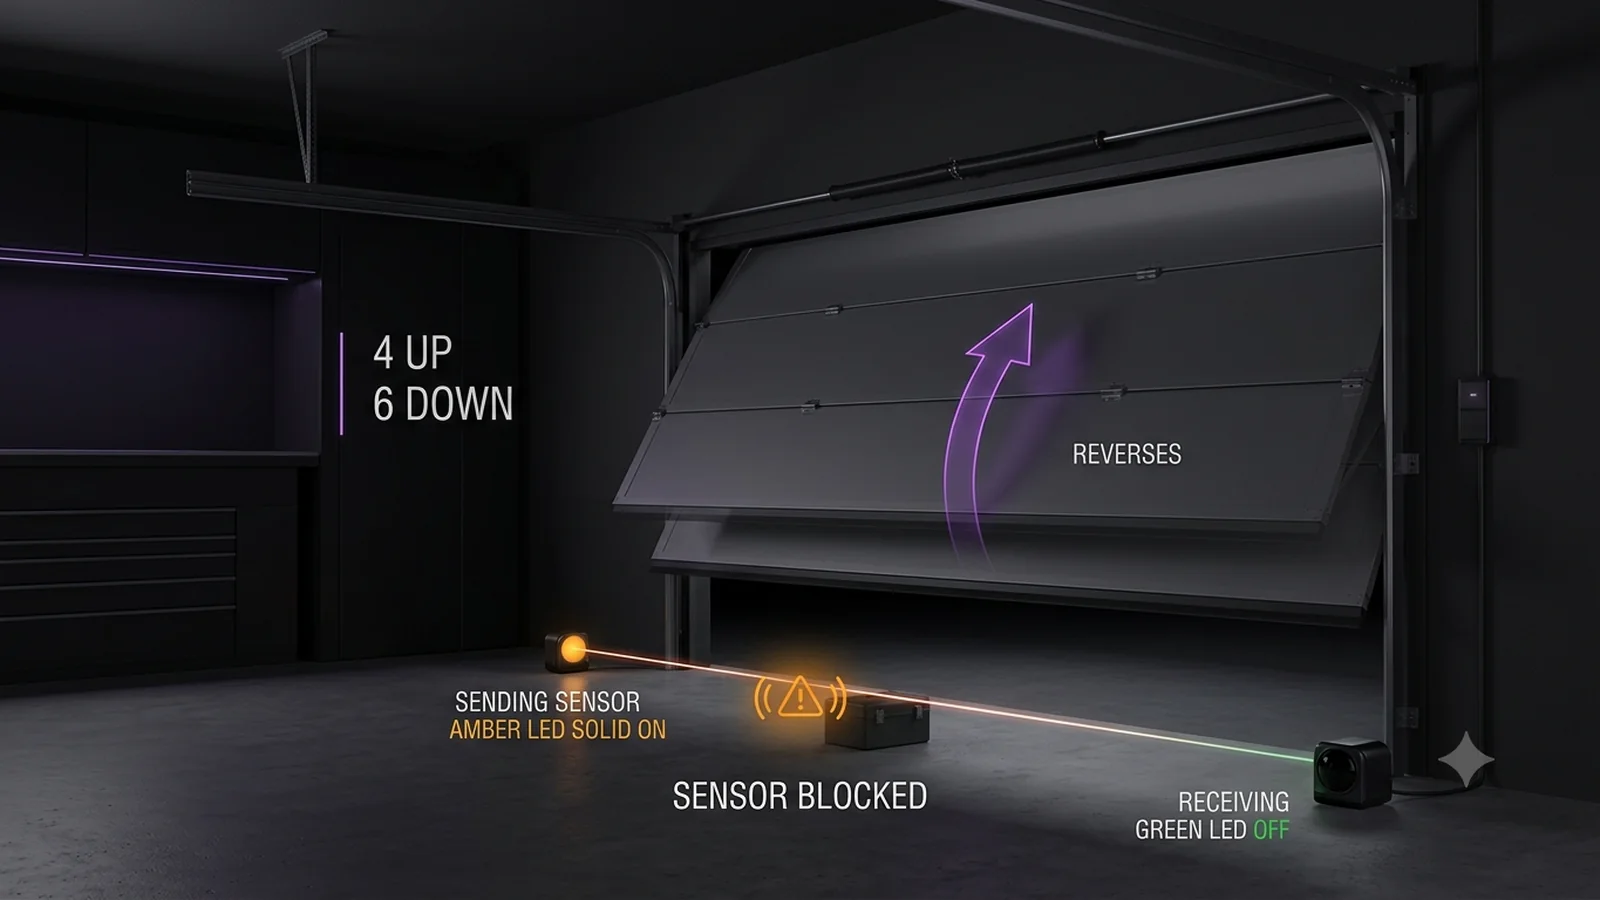
Code 4-6 means the operator detected safety sensors that are obstructed or not aligned while trying to close. Clear the beam, verify both sensor LEDs and align the photo eyes before moving to wiring diagnosis.
Read an UP / DOWN diagnostic code in the correct order
Which arrow flashes first, and how many times?
Security+ 2.0 openers with UP and DOWN adjustment arrows report a code as UP-arrow flashes followed by DOWN-arrow flashes, then pause and repeat. A 4-1 therefore means four UP flashes followed by one DOWN flash; the code does not mean '41 flashes'.
This exact manufacturer signal can feed the following diagnostic family. Keep the original code or LED pattern when troubleshooting.
What you are likely to notice
- The door will not close or reverses during a close command
- A Security+ 2.0 diagnostic display can show 4-6
- The receiving sensor LED may blink or turn off when alignment is lost
Check these in order
1. Clear the beam and clean the lenses
Remove objects, cobwebs and debris from the photo-eye path. Clean the lenses gently so an apparent alignment problem is not just a blocked beam.
2. Read both LEDs
Chamberlain Group documents different branches for both LEDs off, amber on/green off, and a blinking green receiving LED. Both LEDs solid indicates the sensors are aligned and functioning normally.
3. Align the sensors without moving door hardware
Aim the photo eyes at each other and secure their brackets once the LEDs are steady. Do not loosen track or high-force door components to chase sensor alignment.
4. Test the safety reversal system
After correction, perform the manufacturer safety-reversal test. Restoring a steady LED is only part of the job; the protective reversal behavior must also work.
Use LED state to avoid replacing good sensors
Chamberlain Group's sensor guidance gives more information than the 4-6 number alone. Both LEDs off points toward a wiring/power branch. Amber on with green off points toward the receiving side. A blinking green receiving LED points toward alignment or obstruction. Both solid indicates normal alignment and operation at that moment.
Read the LEDs before moving the brackets. Otherwise you may change a useful diagnostic state and make the original problem harder to reproduce.
Why a clear doorway is not enough
The beam can be physically clear and still fail because a bracket shifted, a low-voltage conductor is loose, or a sensor cannot maintain alignment. That is why a 4-6 check includes both the physical beam path and the electrical/LED state.
After the LEDs are solid, test the protective reversal behavior using the manufacturer procedure. The objective is to restore the safety system, not merely get one successful close cycle.
4-6 is a close-command sensor condition with earlier evidence underneath it
Chamberlain Group's diagnostic table describes 4-6 as a condition from the 1-1 or 1-2 safety-sensor branches that is present when the opener is commanded to close. That makes the sensor LED state especially important: 4-6 tells you the safety circuit is blocking the close command, while the amber/green pattern helps separate obstruction/alignment from reversed, shorted or damaged wiring.
Do not treat 4-6 as a reason to increase force or relearn travel. If amber is solid and green is off or flickering, stay with the receiving-eye alignment/obstruction/wiring checks. If both LEDs are off, use the wiring/no-power path. Once both LEDs are solid, use the manufacturer's safety-reversal test and then re-check whether the code returns under a normal close command.
- Preserve 4-UP/6-DOWN and the sensor LED pair together.
- 4-6 belongs to the safety-sensor close branch, not a force-adjustment shortcut.
- If the LEDs are restored but 4-6 returns, move to model-specific wiring/diagnostic support.
A useful 4-6 handoff contains the 4-UP/6-DOWN signal, both sensor LED states, whether the door reverses or simply remains open, and whether the condition survives after the beam is cleared. If the LEDs become solid yet 4-6 returns, that is stronger evidence for a model-specific wiring/sensor diagnosis than repeatedly adjusting the brackets.
Stop DIY troubleshooting when…
- The sensor brackets or wiring are physically damaged beyond an accessible repair
- The door is off-track or mechanically unsafe
- Both LEDs cannot be stabilized
- 4-6 returns after a verified clear and aligned beam
Garage door springs, cables and a falling/unbalanced door can store or release dangerous force. Those are door-system problems, not just opener settings.
Common questions
What does LiftMaster 4-6 mean?
Chamberlain Group describes 4-6 as safety sensors obstructed or not aligned during a close command.
What if both sensor LEDs are already solid?
Both solid normally indicates alignment, so if 4-6 persists, move to model-specific wiring/diagnostic guidance rather than repeatedly re-aiming the sensors.
Is 4-6 the same as ten opener-light flashes?
They can point to the same safety-sensor family on affected generations, but the visible diagnostic behavior varies by opener generation. Use the exact model's code/LED behavior.
Manufacturer sources used
These links are the factual baseline for the diagnostic claims above. Model-specific manuals can supersede general guidance.